Showing posts with label homemade. Show all posts

01 January 2013

Painted Planters


This project I did with my sister, Natricia, for some friends of hers. It was fun and I think this is a great painting project for kids to do as well.

What you'll need:
Terracotta Pots
tempera paint
stencils
blue 1/2 inch painters tape

Step 1: Paint terracotta planters. We chose white and copper for our color scheme but any combination will do. I also like white and dark blue. Or if you know their favorite sports teams colors go with those, the possibilities are endless.


Step 2: Let the base coat dry for at least 4 hours. The pots should be dry enough that the paint won't chip when you remove the tape.


Step 3: Prepare your stencils and paint. My sister made our stencils using Microsoft Publisher by enlarging the font of her choice which we then cut out with a Exacto knife.  You can also use a packaged stencil kit as well. Use the painters tape to hold the stencil in place. We used our friends names, but you can stencil just about any words: plants, names, team slogans the list goes on and on. Let paint dry for at least 4 hours before removing stencils.


Step 4:  Fix any spots that need a touch up. Some paint might have steeped through the thin areas of the stencil just paint over the blotch with a fine tip brush and appropriate paint color.


TA-DA! 


Happy holidays!

Kiss Kiss,

Natrina
The Perki Giver

HAPPY 2013!

Hey Givers!

I know you are all pooped from celebrating the New Year. Thank you all for following, liking, pinning, tweeting and plusing this blog. Please share it with all your friends and post a comment or two.  I hope these projects helped you keep the season bright. I have lots planned for 2013 so stay tuned! 

Check out all we made in 2012!


Awesome Ampersand Mugs

Red Hot Cinnamon Pine Cone Centerpiece

Paint Chip Polka Dot Calendar

Scentsational Bath Salts

Great Guy Necktie

SMASHing Monthly Calendar

Oh Christmas Tree Art
Painted Terracotta Pots


Lots of Love in the New Year! Stay Perki!

Kiss Kiss,

Natrina 
The Perki Giver

26 December 2012

Great Guy Gift: Ombre Necktie

This tie I made for my friend John for Hanukkah! Every year we celebrate at least one night together, its become our families' tradition. I also made one as my Step-Dad's Christmas gift in a different color which he totally loved.


Things you'll need:
Dye-able necktie
Tulip Dye (powder or liquid)
Stainless steel bowl
Water (temperature per instructions)

Step 1: Follow the direction on your Dye  for prepping your tie and preparing the dye. Some dyes need hot water others room temperature will work fine make sure you know which type of dye you are using and how the color is set, either by cold rinse or dry set where you put your item in the dryer for the color to stay. In my case for this project i used a hot water heat setting dye. I also wet my tie first according to the dye instructions.

Step 2: Begin the dying process. There are two main ways to get the Ombre effect
  • Option 1-- Dunk your item to a point where you want the effect to begin then, slowly remove  the item  out of the dye a little at a time. 
  • Option 2-- Sink your item  into the dye a little at a time watch carefully since the dye will climb or be adsorbed by the fabric in this method.. 
Both methods require some time standing over the dye so which ever method is easier for you to do for your item go for it. I tried both and it's my personal opinion that Option 2 gave me a richer color saturation than Option 1 but to each his own.

*Warning:  DO NOT cook or boil dye. Only follow dye instructions.
Option 1- submerge the whole front of tie.
Option 1- slowly pull the tie part way out of dye
Option 1- the tip of the tie stays in the longest

Step 3: Rinse  and set the  Dye. According to my instruction I rinsed my item in cold water until it rinsed clear and then popped int in the dryer at medium heat. Huzzah, a cool tie for your husband, dad, brother, son or guy friend!
Option 1-- Final Results

Here's a look at Option 2 final results, you can clearly see where the dye 'climbed' at the top. this happened when I dipped the tie and then slowly pulled it out, the dye went both directions.
Option 2-- Final Results

Happy Holidays!

Kiss Kiss,
Natrina 
The Perki Giver


24 December 2012

Abstract Christmas Tree Art

O Christmas Tree!


For this project I used one of my favorite art mediums... Shaving cream! Plus this project is fun to do at any age since its quick to do and clean up after. I grab a value pack of blanket cards and do this for holiday cards. Everyone raves about the artistic and personal touch.

Things you'll need:
Aluminum foil tray
Barbasol Shaving cream
Water
card stock paper (white or off-white work best but any color will do)
Tempera and or Acrylic paints
Popsicle stick or squeegee
Plastic Forks and spoons
chopsticks and anything else to make a cool design

Step 1: Fill the aluminum tray with shaving cream. Be generous you are going to use this a couple of times since the paint only sits om the surface and is absorbed by the card. Use your finger, the Popsicle stick or squeegee to spread it out. You get your hands dirty in this project so but in a good fun way.


Step 2: Drop paint in the shaving cream. I use a mixture of tempera or acrylic paint and water to keep the paint from sinking through the shaving cream.A little goes along way here a quarter size drop of paint and a couple drops of water is enough to do 10-15 3x5" cards. This is where the forks, spoons, paint brushes, chopsticks all come in handy, use them to move your paint around in the shaving cream. Different things will create different effects!
Step 3: Once you get your design set, place your card stock on top and lightly press it into the shaving cream. Let it sit for a few seconds and the pull back from the corners on one side. 

Step 4: Next scrape the shaving cream off with the squeegee and SURPRISE there's your design! Let it dry and you have a wonderful piece of art work to decorate with. 


This project is super fun for kids of all ages and the shaving cream makes for an easy clean up, it just rinses away. Do be careful of paint splatter, always wear an apron and put down news or butcher paper to cover your work surface. Most my supplies I got at the Dollar Tree and they can be used again and again.

Have fun making happy little trees!

Kiss Kiss,

Natrina 
The Perki Giver

11 December 2012

Paint Chip Calendar

This project seemed simple but was a bit of a challenge for me. Basically you get paint chips from your local hardware store and a picture frame and put them together. I have lots of tips to share so you don't run into the snags I did.


What you need:
Paint chips ( at least 15 to 35 depending on their size)
A large picture frame with glass
Scissors
Contact paper ( plain, patterned and or transparent*)
Double side tape or glue stick


After selecting my color scheme ( randomly grabbing all the pretty purple and blue ones) I decide to perki this project up a notch by cutting my paint chips into circles; because who wants to be a square?
I got a bunch of paint chips that were 3X5 inches in size so I was able to get two 2" inch diameter dots of each color. I had to trace each circle and cut them out one by one the old fashion handmade way. Which made me realize how much I need more craft tools. My hubby suggested using a compass but I'd rather have one of those neat circle punches or cutting tools ( hint, hint wink!) But once I cut all my circles this project sped up a bit.
The other hiccup was my frames. I had gotten these floral and dog prints at my local goodwill for $4.95 each. I'm not crazy over the prints, I really just wanted the frames and glass around the prints. So I didn't mind so much when the floral one didn't have a backboard and I had to cover it in white contact paper. Everything was going fine until I pick up the frame and broke the glass. Panic attack? Nope, it all worked because miraculously the floral print fit perfectly into the doggie frame! Now to think of something cool to do with the extra frame....


Here are the steps:
1) Cut, decorate or embellish you paint chips how ever you like. Just make sure they lay flat and have enough room to write events in.


2)  I covered my back board in white contact paper but you could use anything really, fabric,wrapping paper, tissue paper, scrapbook paper, patterned contact paper whatever suits your fancy.

3) Arrange your paint chips artfully on the backboard.


4) Make it permanent, glue your chips in your arrangement.

5) Put it all back together (carefully), wrap and give!


 Tips:

  • Use a flat head screw driver to lift and lower the staples that hold the backboard in the frame.


  •  Use a wet erase markers instead of a dry erase one,the ink wont wipe off unless it gets wet or leave residue. Consider using white or neon opaque markers if you use dark paint chip colors.


Happy Hanukkah !
Kiss Kiss,
Natrina The Perki Giver

03 December 2012

Red Hot Pinecone Centerpiece

This gift is a center piece for my Mom's Christmas dinning table. She goes all out for the winter holiday season. She was super excited when she got this deal on pine cones and wanted me to perk them up a bit.
Here goes a Perki Giver Original!


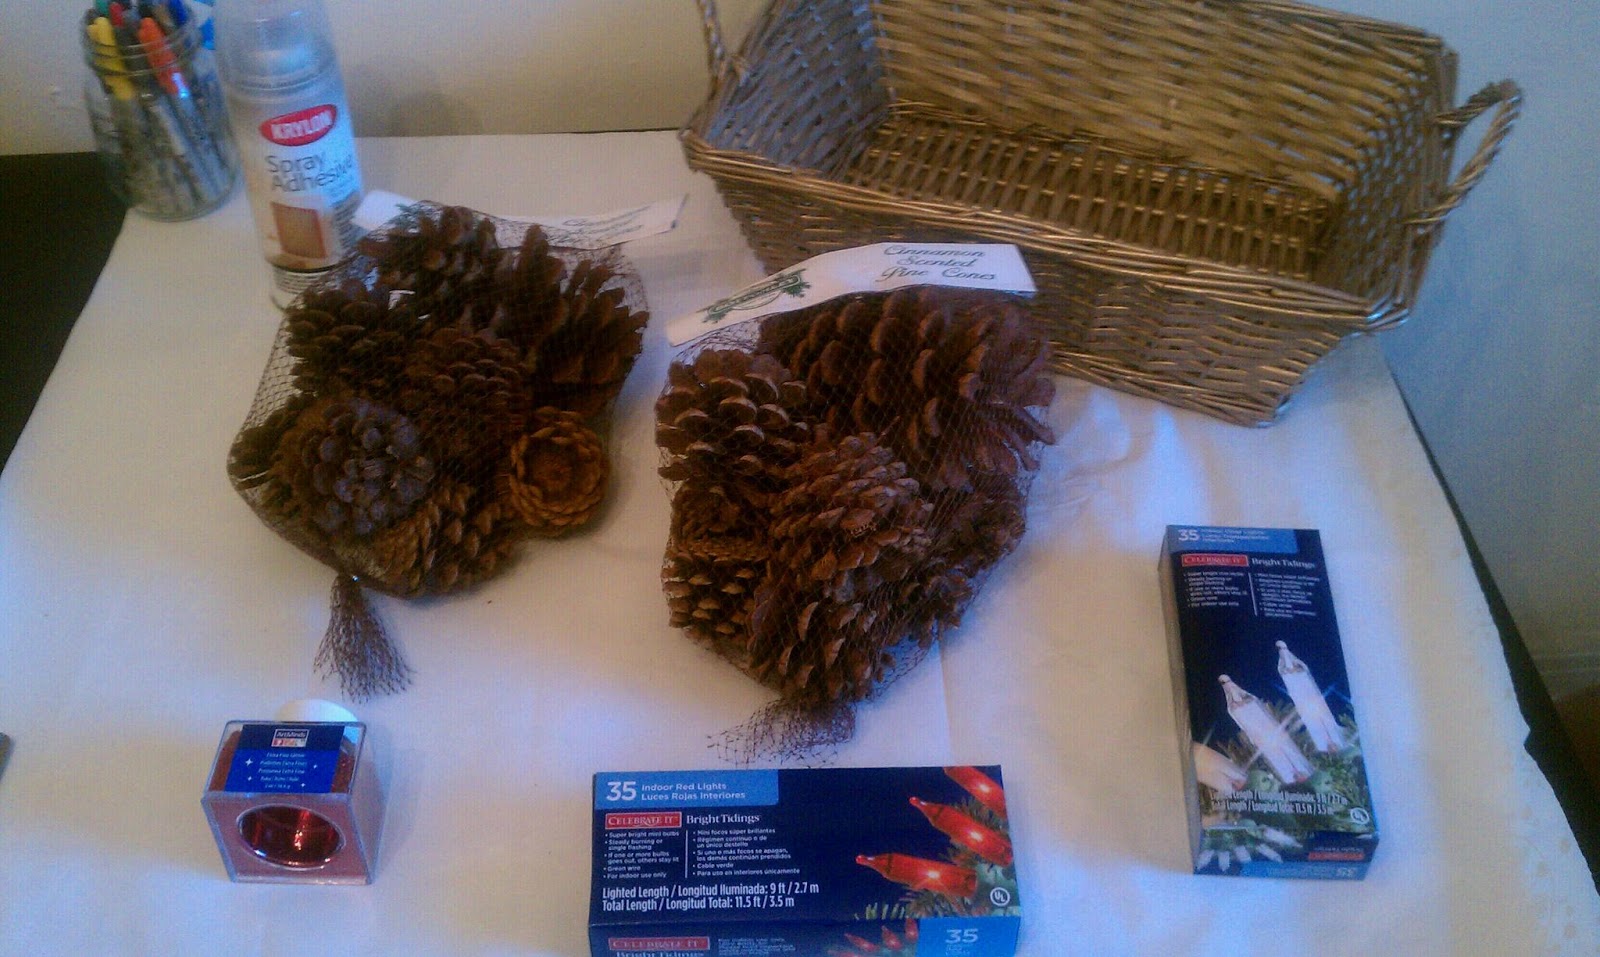
What you need:
Pine-cones
Fine red glitter
2 Tbsp of cinnamon
Spray adhesive
Basket
Red or white Christmas lights


1) Mix red glitter and cinnamon in a paper bowl . Put down paper over your work surface and don't spray over your glitter bowl or it will stick more to the bowl than the cone.


2) I strung my red lights through an opening in the basket weave. Place fake snow or  paper-towel (its just keeps the glitter from spreading everywhere) in the bottom of the basket.


3) Spray pine-cone with spray adhesive. Watch your fingers they'll stick together from the glue.


4) Roll pine cone around in the glitter bowl. I used a plastic spoon to scope the glitter over the cone to get it all in the nooks and crannies. tap lightly on the edge of bowl to knock off excess glitter and set aside to dry.


5) Repeat for each cone. Spray , Roll, Tap!


6) Once your pine-cones are dry place them  in the basket and  artistically wrap the lights around the cones. The heat from the lights helps the cinnamon emanate throughout the room. Hmmm smells like Christmahanakwanzika!

Tips:

  • I used 2 bag of pine cones for this one basket and it took me two hours and 10 mins to arrange. 
  • Be as liberal as you want with the glitter and cinnamon the more the smellier which is  a good thing in this case.


Enjoy!

Kiss Kiss,

Natrina The Perki Giver


Follow Me on Pinterest

25 November 2012

30 Handmade Gifts til Christmahanakwanzika or A Gift for Every Holiday until New Years' Eve

Hi folks!
 I'm Trina and this is my blog. It's about  two of my favorite things making crafts and giving them to just about any one who will take them aka family and friends. If you are  like me you are all jazzed by the holiday season and are excited to share it with your loved ones, right? Or maybe the tryptophan hasn't worn off yet and your not sure where to even begin gift shopping none the less you are probably going to want to give some thing to some one  very soon  why not make and give that special some one something you put your heart into? Oh, but I'm not that crafty you say. Well I'm here to help. I am going to be the guinea pig for all those neat do-it-yourself gifts we see all over the interwebs, so you can hand make the most awesome homemade gift ever.

This year I am challenging myself to make gifts for my loved ones with in the next 30 days. I've made some gifts of this sort in the past like mini family cookbooks for my sister and mom, gift baskets for friends and  birthday cards for sorority sisters. This year will be different!
 (1)  I'm going to attempt to document it all in this blog so you can follow along at home
 (2)  my list includes 20 people of different backgrounds with a couple birthdays thrown in the mix not to mention all the different hostess gifts, stocking stuffers, and  holiday party/potluck/gift exchange that pop up along the way.

 I'd like for the gift to be unique to each person so I'll need some inspiration from my friends on Pinterest  (check out my 'homemade gifts' board). Let's see do I have all the markers of a an S.M.A.R.T. goal?


  • S - Specific (or Significant). making gifts.............................................................................check
  • M - Measurable (or Meaningful). created a list of people who would receive gifts...........check
  • A - Attainable (or Action-Oriented). making one gift a day ...............................................check
  • R - Relevant (or Rewarding). warm fuzziness from giving to others ..................................check
  • T - Time-bound (or Track-able). doing this blog to keep me honest ..................................check
Mark your calendars with the important dates below. Do not forget to mark December birthdays and events for  church, work and school etc too.

Hanukkah begins in the evening of SaturdayDecember 8, 2012, and ends in the evening of SundayDecember 16, 2012.

Winter Solstice is on FridayDecember 21, 2012.

Christmas Day is on TuesdayDecember 25, 2012.


Kwanzaa begins WednesdayDecember 26, 2012, and ends Tuesday,January 1, 2013.

New Year's Eve is on MondayDecember 31, 2012.
New Year's Day is on TuesdayJanuary 1, 2013.

Seeing how fast that calendar has filled up I think one of those super cute paint chip ones would be a great gift for my best friend, stay tuned! 

Kiss Kiss,

The Perki Giver